
Here, I will show you step by step procedure how to set up your Raspberry Pi with an external monitor and Keyboard. And later I will show how to light a LED using Raspberry Pi.
Format the SD card
- Download and install this software (from the SD card Organization): https://www.sdcard.org/downloads/formatter_4/index.html
- Open the program, and select the right drive, after that just click “FORMAT"
- You have just formatted your SD card!
Install the Raspbian OS Image
- Download the raspbian os from https://www.raspberrypi.org/downloads/raspbian/
- To write the .img file into the SD card download the Win32 disk imager from https://sourceforge.net/projects/win32diskimager/ [ The image file can not be written on the SD card just by “Copying and Pasting” it. You have to write the image file using disk imager]
- Now eject SD card from the PC and put it in the raspberry pi.
Share the internet of your PC so that Raspberry PI can use it
- Power it on through the micro USB cable and connect to the internet through an RJ45 cable [Ethernet cable] with your PC.
- Now you need to share the internet of your PC so that Raspberry Pi can use it. If it is already shared then it is fine. If not, Go to— Control Panel >> Network and Share Centre >> Change adapter Settings >> Wireless Network Connection >> Properties. To share the internet, please click on the "Sharing" tab in wireless network adapter and click on something like 'share this computer's network'. By that, Raspberry Pi will share the internet of this computer. [Raspberry pi is connected to the LAN and internet is connected through wifi in our PC. We are going to use the internet of this PC]
- Then Go to— Control Panel >> Network and Share Centre >> Change adapter Settings >> Local Area Connection >> Properties >> Internet Protocol version 4 (TCP/IPV4) >> Properties >> Note the IP address. Remember, to see the IP address you need to you need complete step 2
 This IP address is going to be the default gateway of your raspberry pi.
 - Take a Note of the IPV4 address shown under Ethernet Adapter “Local Area Network Connection”. This IP address is going to be the default gateway of your raspberry pi.

Configure Raspberry Pi
- Power Off the Raspberry pi. Eject the SD Card and put it back on your PC.
- In the Disk Drive open the cmdline.txt file.
- There is a line in the file. Now at the end of this line type “ip= [any valid IP address which is in the same class of the IP address taken note under Ethernet Adapter “Local Area Network Connection” in the Step 4 of the last paragraph; but NOT the noted IP address it self] :: Noted IPV4 Address in the Step 5 section of the last paragraph].
- Eject the SD card, put it back on the Raspberry Pi and Power on Raspberry Pi and connect to Ethernet port of your PC.
- Next go to— Start Menu >> Command port >> Type ‘ipconfig’ >> press Enter.
- Save the changes and close the .txt file.
- Eject the SD card and put it back in the Raspberry pi. Power it on.
To Make sure that both the IP addresses are from the same class just change the last 4th section of the IP address. For example, my ethernet adapter IP noted under Ethernet Adapter “Local Area Network Connection” is 192.168.137.1, then write in the cmdline.txt file
ip=192.168.137.10::192.168.137.1 (OR 192.168.137.X::192.168.137.1)
Also make sure that they are written on the same line, NOT in the next line. Why I am doing this is because in the cmdline.txt file, the format is
ip=[IP of the Raspberry Pi]::[the gateway IP of the Raspberry PI].
The PC is ethernet is working as if it is a gateway of the Raspberry PI as the Raspberry PI is connecting to the internet through ethernet. That is why I used ip=IP of the Raspberry Pi which I assign IP address in Ethernet Adapter “Local Area Network Connection”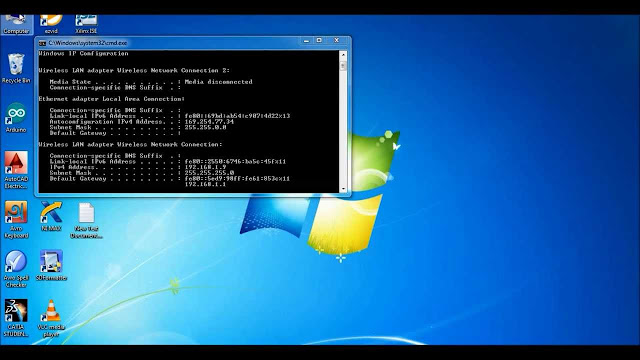

SSH to Raspberry and start the Desktop
- Download Xming from https://sourceforge.net/projects/xming/ [ Xming is for using the GUI of the PC]
- Download putty from http://www.putty.org/ [Putty is for establishing the SSH connection to our Raspberry pi PC]
- Ping the Raspberry pi PC. In the command port type— “ping [IP address you have assigned to the Raspberry pi pc]” >> Press “Enter”
- After successful pinging, Open Xming. You will see the Xming Icon is on the bottom right corner of the taskbar. That means Xming is running.
- Open Putty.
- In the box named “Host Name(or IP address)” type the Assigned IP address for the raspberry pi.
- In the Left sidebar menu Click on SSH >> Click on ‘X11’. Make sure that “Enable X11 Forwarding” is ‘Checked’.
- In the Left sidebar, Click — Session. Right any name under saved session. Click Save >> Open. (so you saved the configuration/session so that you can easily open it later)
- A new window will Pop up.
- For logging in, type — log in: pi >> password: raspberry >> enter
- Now type “lxsession” >> enter. This will initiate the Desktop GUI of the raspberry pi OS.
- Now, You are in the raspberry pi. :)
- Open the default browser (in my case it was Midori) and search on the internet.
- To terminate the SSH shell of the Puttypuputtyputty Current session simply press Ctrl+C. It will kill the session.
Hope you enjoyed!! Best of luck!! Have fun.


0 Comments